Change root for gene tree
This post is about how to change your gene tree from an undirected tree to a directed tree by setting the root for your gene tree. You must set the root before proceeding to working with the molecular clock hypothesis, rate tests, or tree reconciliation.
This can be done with UGENE (see below) or at one of many online websites (see end of page).
About rooted and unrooted
For a rooted phylogenetic tree, each node with descendants represents the inferred most recent common ancestor of those descendants. The root node, as the top node in the tree, has no parent. Unrooted trees show the relatedness of the nodes, but not the ancestry.
With respect to Newick files, the following list was drawn from sources at the Wikipedia page on Newick format.
- When an unrooted tree is represented in Newick notation, an arbitrary node, usually an internal one, is chosen as its root.
- A rooted (on an internal node) binary tree has exactly two immediate descendant nodes for each internal node.
- An unrooted binary tree has exactly three immediate descendant nodes for the root node (an arbitrary internal one) and two for each other internal node.
What to do
Root your gene tree by selecting the outgroup, then export the new Newick file, to be used in subsequent exercises (e.g., Tree reconciliation)
Background
“Rooting” a gene or phylogenetic tree applies a hypothesis of evolution among the taxa displayed. To root a tree — a directed tree — implies that each node in the tree with descendants represents the inferred most recent common ancestor among the descendants. Gene and phylogenetic trees in Newick format are not rooted by default; they are undirected trees. (Technically, Newick format automatically roots the tree using a midpoint root, which is completely arbitrary.) While unrooted trees show the relationships among the taxa, they do not make assumptions or claims about the direction of change, i.e., one cannot look at the tree and determine which character state is ancestral or which is derived. For example, if two species differ at a position in a sequence by one nucleotide, A or G, and the tree is not rooted, then neither nucleotide can be said to be ancestral. Directed trees allow the assertion of which state is ancestral, in this case, the A or the G. Directed trees are accomplished by setting an outgroup. An outgroup is a taxa distantly related to other taxa in the study.
In our study, we have have 14 species represented, and the consensus tree is shown in Fig 1.
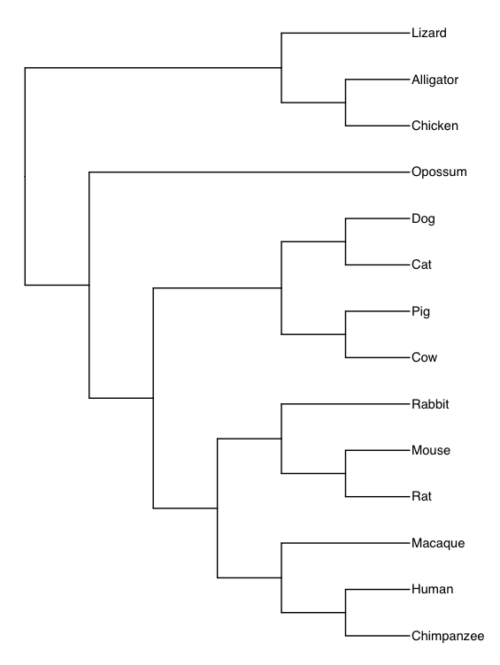
Figure 1. Consensus tree for our 14 taxa.
Our taxa included 11 mammals and three reptiles (Alligators, lizards, and birds). The outgroup is the reptile group. This evolutionary hypothesis is supported by much evidence (Carroll 1982), all independent of the protein sequences included in our study.
Note that the grouping reptiles is what we call a paraphyletic group. Just looking at them, you would be more inclined to group lizards with alligators than with birds (Aves). However, alligators share a more recent common ancestor with birds. Thus, in our study, reptiles form the outgroup to the mammals. In contrast to paraphyletic reptile group, Mammals is a monophyletic group: all members of the group share a common ancestor.
Once an outgroup is established for a gene tree (or a phylogenetic tree), then direction of chance for character stats can be established. In our example, if the outgroup has A at the position, then A is considered the ancestral state and G would be the derived state.
Work with Newick files in R
I’ve posted a series of R scripts, including how to re-root the tree with Newick files, using the ape package in the R programming language at Mike’s Biostatistics Book.
How to set outgroup in UGENE
By default, a midpoint tree is assigned in the Newick format. While there are better apps than UGENE for editing trees, you can accomplish the needed changes in UGENE. Consider the gene tree for HIF1A (Fig 2).
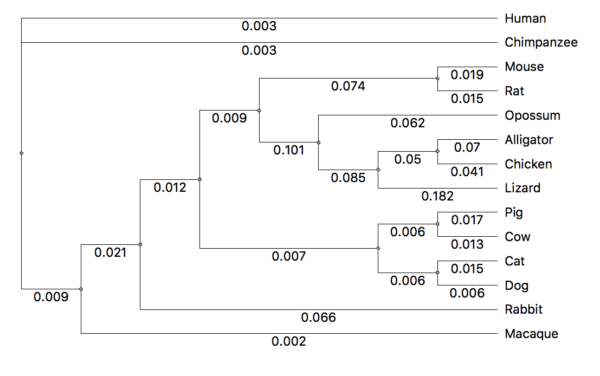
Figure 2. Bayesian gene tree, HIF1A, from UGENE. Tree is arbitrarily rooted at midpoint.
With the tree window active in UGENE, move the cursor to the ancestral node for the taxa you wish to set as the outgroup. Fig 3 shows just the nodes with the reptiles. The red arrow points to the node we will select to indicate the outgroup.
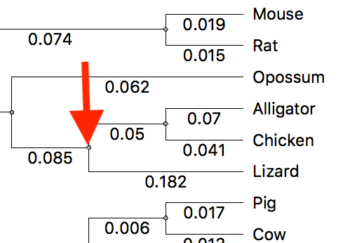
Figure 3. Subset of tree from Fig 2. Red arrow points to the node we will select to set the root.
Click on the node to select the outgroup. Next, right-click to bring up a context menu (Fig 4). Select “Reroot tree”. The tree will display in rooted form (Fig 5).

Figure 4. Screenshot UGENE menu. Right-click, the context menu is displayed. Select Reroot tree from the options.
The directed tree is shown in Fig 5.
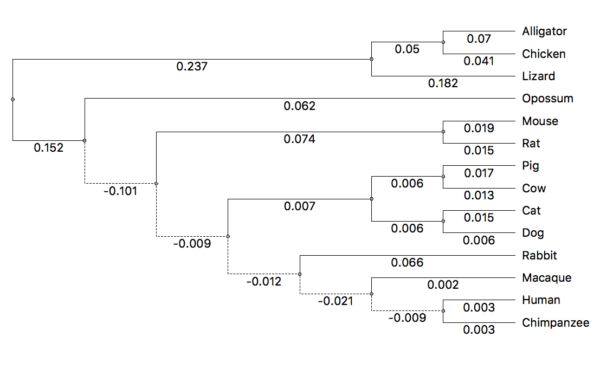
Figure 5. The now directed tree after setting the root.
Note that negative branch lengths may appear. Negative branch lengths are biologically impossible. However, for our next analyses, this will be OK for our analysis. The edge lengths represent the statistical distance among the groups given a rooted tree. (The solution would be to set the edge lengths to zero for any negative branch lengths. Please do not do this for your project, it introduces other complications that are beyond the scope of our project.)
Save the revised Newick file for your gene tree
Finally, export the new Newick file. From the Object window in UGENE select the Newick file, then right-click to bring up the context menu (Fig 6). Select Export document.
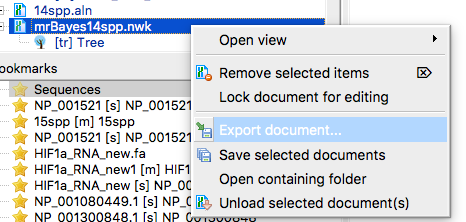
Figure 6. Screenshot UGENE menu. Select NEWICK file from Object window, right-click, select Export document.
Change the filename to indicate the tree is rooted (Fig 7). If necessary, update the location on your computer to store the file. The default is to Add to project, but this is not necessary, all we want is the file.
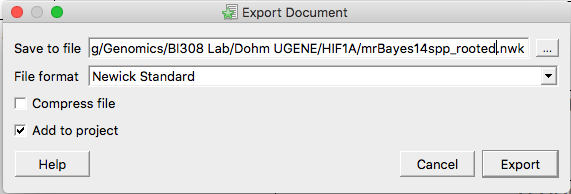
Figure 7. Screenshot UGENE menu. Select NEWICK file from Object window, right-click, select Export document.
You now have the file you will need for the next steps in the project, eg, Tree Reconciliation.
Other tree viewer apps
(1) icytree.org
From the manual: To re-root a tree, simply hover the mouse cursor over an edge, and click the left mouse button while holding down the SHIFT key. This produces a new root node exactly in the middle of the selected edge.
Click on edge of outgroup, which brings up menu. Select Tree structure, then Re-root tree here (Fig 8).
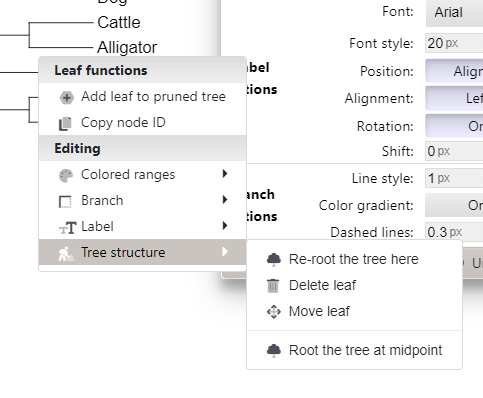
Figure 8. Screenshot itol tree of life — re-root menu.
(3) Treegraph2 is a relatively new Java implementation, with many nice features. It is available for both Macs and Windows PCs at http://treegraph.bioinfweb.info/.
In brief, to accomplish re-rooting in Treegraph after loading the file simply click on the branch of the OUTGROUP, then press and hold the key combination Command+R (Macs) or Ctrl+R (Windows). Many additional features are available.
(4) Figtee [draft]. is available for both Macs and Windows PCs at http://tree.bio.ed.ac.uk/software/figtree/
References
Carroll, R. L. (1982). Early evolution of reptiles. Annual review of ecology and Systematics, 13(1), 87-109.