Make a phylogenetic tree
to add: itol, phyloT, timetree.org, phylopic.org, R, ggtree, ggimage
What to do
- Use NCBI TreeView to create a phylogeny for your 13 plus 1 species (Table 1)
- Save your tree as an image
- Save your tree in Newick form
- Add your 13 plus 1 tree (Newick form) to your UGENE project
Table 1. The fourteen species (13 plus 1) we have are
Alligator
Cat
Cattle
Chicken
Chimpanzee
Dog
Human
Macaque
Mouse
Lizard*
Opossum
Pig
Rabbit
Rat
where * is to remind you that Anolis carolinensis was the species name (others possible).
Table 2. Species names for our 14 taxa
Alligator mississippiensis, Felis catus, Bos taurus, Gallus gallus, Pan troglodytes, Canis lupus, Homo sapiens, Macaca mulatta, Mus musculus, Anolis carolinensis, Didelphis virginiana, Sus scrofa, Oryctolagus cuniculus, Rattus norvegicus
I have a list of species, how do I get a phylogeny?
We will collect sequences of proteins for different species, then create a gene tree in UGENE (Lab 3: Thirteen + 1 species). However, gene trees (i.e., a “phylogeny” of species based on variation at just one gene) may differ from the true phylogeny for a number of reasons (Swenson 2012), including
- genetic polymorphism (i.e., sequence in the database does not capture variation in the species)
- the homologous genes are not actually orthologs (similar because of shared ancestry), but rather, are paralogs, similar because of convergent evolution
- rates of evolution may differ among the lineages
Gene tree & phylogeny reconciliation between gene trees and “true” phylogeny would allow us to study which of the three conditions listed above may be at play, and is of interest to us in determining which of our GOI gathered in the class from the GWAS database are likely to be functionally important causes of the phenotype differences.
To make a phylogeny, we would want to incorporate all available information, not just from a single gene. While in the vast majority of cases we can’t know what the true phylogeny is, we can construct a consensus tree. Consensus trees display the tree supported by all/most of the evidence.
The purpose of this exercise is for you to take advantage of the resources available by calling species from iTOL via phyloT or other interfaces.
Note: An alternative site for making a consensus tree is timetree.org, although you must upload a text file with your list of species names (not common names), so it is a little less straightforward compared to NCBI taxonomy browser.
NCBI Taxonomy can be used for constructing a consensus tree. Once at the NCBI taxonomy browser site, you have two choices:
- Add each species one at a time or
- Provide a text file with all of the species listed, one species per line.
Given that you have just 14 species to work with (listed for your convenience in Table 1 and Table 2), adding one at time might be better to start with because there can be differences between what we call a species and what the Taxonomy Browser has in its records (Note: I have verified that all of our species are available in Taxonomy browser, but as a hint, you may have to play around with what they are called in order to complete the exercise!)
SOP R and iTOL
[draft, needs updating]
The following R code takes a list of taxa, interacts with iTOL, and retrieves a phylogenetic tree. Code assumes R is locally installed and ape and rotl packages installed. Tree is mid-rooted, but no branch lengths; use Grafen’s method (Grafen 1989) to provide arbitrary, scaled branch lengths. (For more abut this function, call the help page in R by typing ?compute.brlen at the prompt.) Package easycsv is not required, but provides os-independent choose directory function.
#modified from https://cran.r-project.org/web/packages/rotl/vignettes/rotl.html

library(ape)
library(rotl)
library(easycsv)

#Check working directory
#getwd()
#setwd(easycsv::choose_dir())
myTaxa <- c("Alligator mississippiensis", "Bos taurus", "Canis lupus", "Didelphis marsupialis", "Felis catus", "Gallus gallus", "Homo sapiens", "Lepus timidus", "Macaca sylvanus", "Mus musculus", "Pan troglodytes", "Rattus rattus", "Sus scrofa", "Zootoca vivipara")
resolved_names <- tnrs_match_names(myTaxa)
my_tree <- tol_induced_subtree(ott_ids = resolved_names tip.label <- new_tiplabels
plot(my_tree)
#set branch lengths
my_tree <- compute.brlen(my_tree, method = "Grafen", power = 1)
plot(my_tree)
#print tree code to view
write.tree(my_tree, file="")
#save tree to file
write.tree(my_tree, file = "my_tree.nwk")
tip.label <- new_tiplabels
plot(my_tree)
#set branch lengths
my_tree <- compute.brlen(my_tree, method = "Grafen", power = 1)
plot(my_tree)
#print tree code to view
write.tree(my_tree, file="")
#save tree to file
write.tree(my_tree, file = "my_tree.nwk")
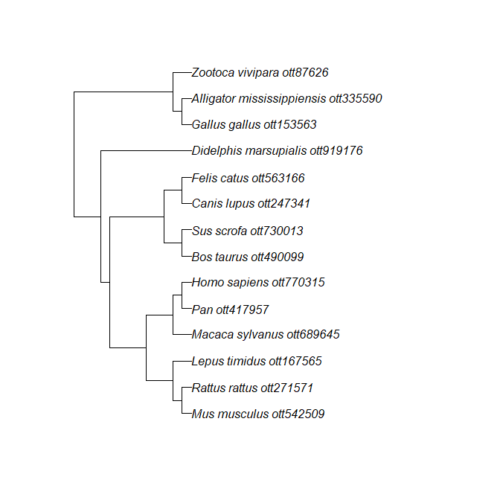
Figure 3. Tree retrieved from iTOL by R package rotl.
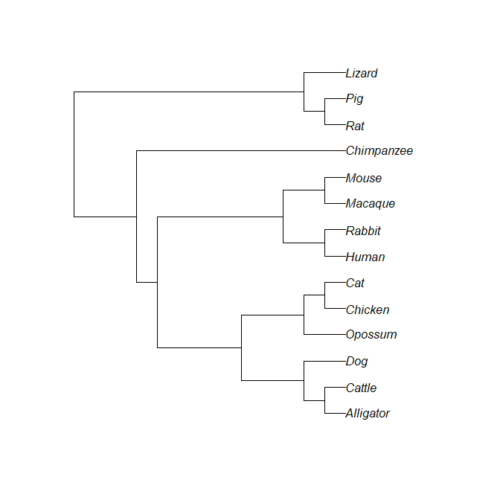
Figure 4. iTOL tree after tip name and branch (edge) length updates.
SOP Timetree
Our consensus phylogeny was generated from timetree.org , with added bonus that calibrated divergence times will be included. That is, instead of branch lengths as expected change, the branch lengths correspond to time in millions of years.
To make a tree, create and save a text file (e.g., Notepad or TextEdit), with a list of species, one species per line (e.g., from Table 2). Save the file as “timetree_14spp_list.txt” (without the quotes). Next, go to timetree.org; portion of homepage shown in Figure 5.
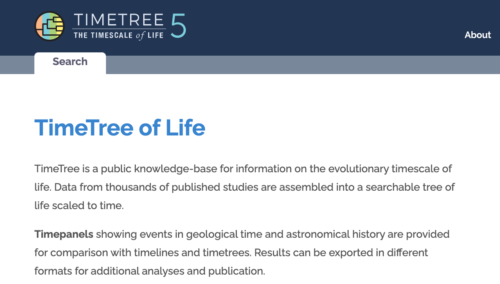
Figure 5. Screenshot of portion of timetree.org (May 2022).
Scroll down the homepage to find Load a List of Species (Fig. 6)
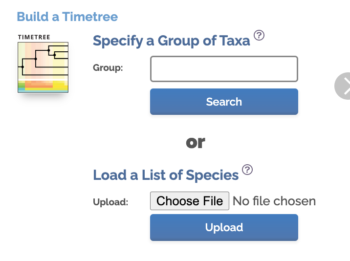
Figure 6. Screenshot from timetree.org
Click Choose File button, select the text file you created with the list of species. Click Upload button once file is selected. Figure. 7 shows portion of results page.
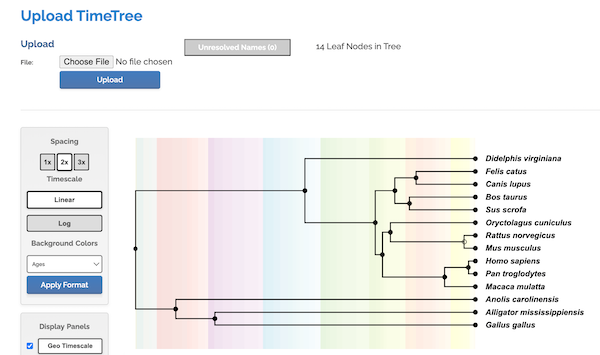
Figure 7. Screenshot results from timetree.org
We want the Newick file, the code for the tree shown in Figure 7. Scroll down the results page, locate Export Tree, and click on To Newick File.

Figure 8. Screenshot timetree.org, Export Tree.
Timetree.org will save the Newick file, accessing your os file system so that you can save the file to location on your computer (e.g., your working folder). The default name same will be same as the text file you used plus the .nwk file extension (e.g, timetree_14spp_list.nwk).
Once we have the Newick code in hand, we can use any tree viewer app. The phylogenetic tree is shown in Fig. 9A (with Newick string in Fig 9B), was drawn in R with the ape package.
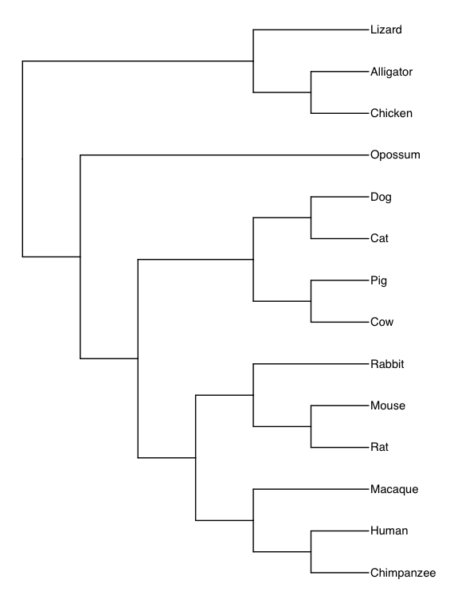
Figure 9A. Consensus phylogeny for our 14 species, compiled from data available at timetree.org. Branch lengths not displayed. Newick text in Figure 9B.
((Lizard:279.65697667,(Chicken:236.50266286,Alligator:236.50266286):43.15431381):32.24694470,(Opossum,(((Cat:54.32144118,Dog:54.32144118):23.43351523,(Cattle:61.96598852,Pig:61.96598852):15.78896789):18.70743276,((Rabbit:82.14079889,(Rat:20.88741740,Mouse:20.88741740):61.25338149):7.68238853,(Macaque:29.44154682,(Chimpanzee:6.65090500,Human:6.65090500):22.79064182):60.38164060):6.63920175):62.13519841):153.30633379);
Figure 9B. Newick code for tree in Figure 9A.
Update Spring 2022, changed Cow to Cattle in the Newick file, but did not update the figures.
The branch lengths in the consensus tree (Fig 1A and 1B) are divergence times in millions of years (mya), and are not comparable to the gene tree branch lengths , which are genetic distances. You’ll need to remove the branch lengths before trying the reconciliation steps, which was done for you (Fig. 6)
((Lizard,(Chicken,Alligator)),(Opossum,(((Cat,Dog),(Cattle,Pig)),((Rabbit,(Rat,Mouse)),(Macaque,(Chimpanzee,Human))))));
Figure 6. Newick code for consensus tree without divergence time branch lengths
Questions
References
Efron, B., Halloran, E., & Holmes, S. (1996). Bootstrap confidence levels for phylogenetic trees. Proceedings of the National Academy of Sciences, 93(23), 13429-13429. link
Grafen, A. (1989). The phylogenetic regression. Philosophical Transactions of the Royal Society of London. B, Biological Sciences, 326(1233), 119-157.
Lemey, P., Salemi, M., & Vandamme, A. M. (Eds.). (2009). The phylogenetic handbook: a practical approach to phylogenetic analysis and hypothesis testing. Cambridge University Press. (hint: a little snooping on your part and you’ll find a pdf of the entire book)
Pamilo, P., & Nei, M. (1988). Relationships between gene trees and species trees. Molecular biology and evolution, 5(5), 568-583. link
Swenson, K. M., & El-Mabrouk, N. (2012, December). Gene trees and species trees: irreconcilable differences. In BMC bioinformatics(Vol. 13, No. 19, p. S15). link
https://en.wikipedia.org/wiki/Evidence_of_common_descent
Yang, Z., & Rannala, B. (2012). Molecular phylogenetics: principles and practice. Nature reviews genetics, 13(5), 303. link
Yu, Guangchuang. Data Integration, Manipulation and Visualization of Phylogenetic Trees at https://yulab-smu.top/treedata-book/index.html
/MD