Install Cytoscape
Cytoscape homepage
current version 3.10.3
Run Cytoscape in browser
Cytoscape is best installed onto your desktop or laptop computer. However, limited work with networks can be accomplished via their online interface at https://web.cytoscape.org/ (Fig 1). The online version is your best option if you are running a Chromebook or iPad tablet.
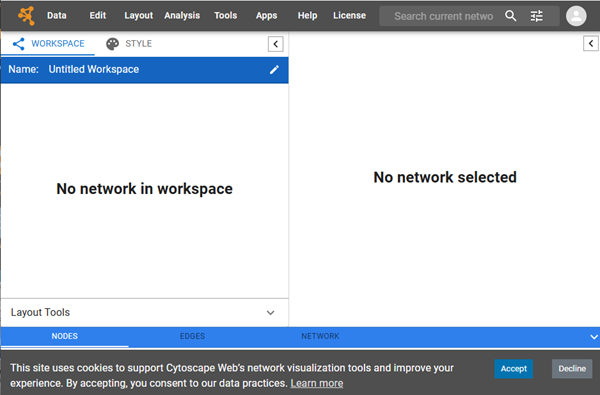
Figure 1. Screenshot of web.cytoscape.org homepage.
For example, small network files may be imported:
Data → Import → Network from File…
which brings up a menu (Fig 2) that allows you to locate and upload text files (but not spreadsheet files, per the note, see Fig 2. Spreadsheet files may be imported in the desktop versions of Cytoscape).
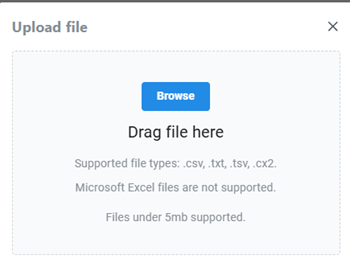
Figure 2. Screenshot of web.cytoscape.org text file upload menu.
From there, set up the import by identifying the columns; minimally, source node and target node. See below for instructions.
Install Cytoscape
Download the current version for your computer system: WinPC or macOS. Your browser should recognize your computer type and direct you to the correct download page. For example, Windows 11 (Fig 3).
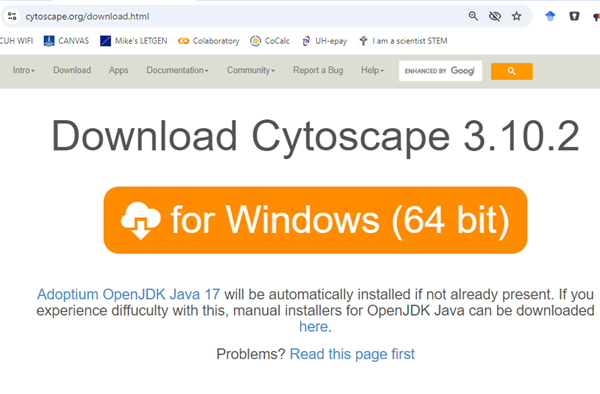
Figure 3. Screenshot Cytoscape download page for Microsoft Windows 11 operating system.
Note that Cytoscape’s install file will also install a Java Development Kit, which is needed for Cytoscape to run. As usual, trust the default instructions and allow the installation to proceed. The last page of instructions will be a page that says Finish.
Close the page and start Cytoscape. If you followed the defaults, then you installed a desktop startup icon (Fig 4).
![]()
Figure 4. Cytoscape desktop startup icon.
After starting the app, you will see a splash screen (Fig 5)
Figure 5. Cytoscape splash screen
Once the app has launched, you’ll see this starter window (Fig 6).
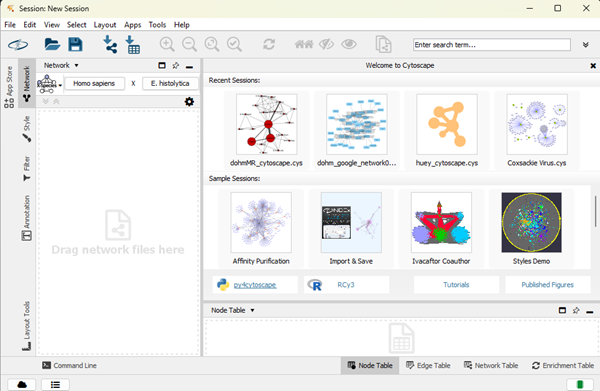
Figure 6. Screenshot of Cytoscape’s starter window.
plugins
Base Cytoscape can do many things, but the power of the platform is that users write specialized extensions to make the software do more. The recommended plugins we need for Systems Biology are listed on your CANVAS assignment pages. For an example, we use the Social Network plugin to gain familiarity with working with Cytoscape.
Install and run app plugin
To install apps, start Cytoscape, then from menu bar select
Apps > App store > Show App Store
Find the search box and start typing the name of the app, e.g., Social. Enter (return), and your browser should navigate to the app.cytoscape.org web page and the desired app should be visible.
Click the app link to bring up the app’s install page; you may download the plugin install file, or press the install button and allow Cytoscape to add the app.
Once the app has been installed, it’s good practice to restart Cytoscape.
To start using an app, from the menu bar select Apps and select your plugin from the dropdown menu (Fig 7).
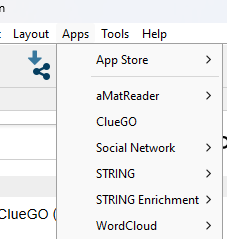
Figure 7. Screenshot Apps menu
Import network from text (csv) or spreadsheet (xlsx) file
Although a network graph can be started from scratch in Cytoscape, it is much easier to begin with a network, and, if necessary, add nodes and edges once a graph is already present. The simplest way to do this is to create a two column text file, like the one presented in Table 1. Note — use a simple text editor, not your word processing software. Apple macos folks, your text editor is called just that, Text Editor (make sure to set formatting to plain, not the default rtf); Microsoft Windows folks, your built-in text editor is Notepad. Both save to UTF-8 default characters and use the .txt file extension.
Table 1. Simple network in two-column data file.
| n1 | n2 |
| A | B |
| A | C |
| A | D |
| B | D |
In your text file, enter the above table with a comma separating entries on the same row, as shown in the next paragraph.
n1, n2
A, B
A, C
A, D
B, D
Once the table is available (note: desktop users can load graph tables via spreadsheet file, set as compatible to Microsoft Excel format, .xlsx), we import the file as a network file. For example, I saved my text file as tryMe.txt. You should, of course, name the file more appropriate to the subject and assignment — and of course, include your name.
Data → Import → Network from File…
which brings up a menu (Fig 8) that allows you to locate and upload text files. Users of the online Cytoscape, instructions for importing were presented in Run Cytoscape in browser above.
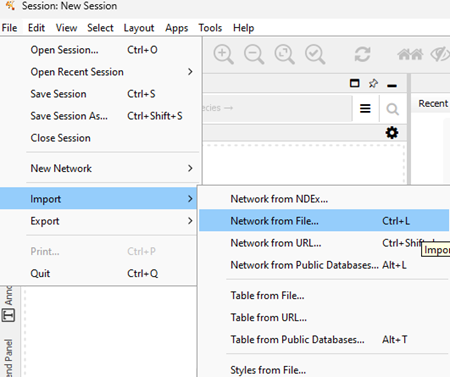
Figure 8. Screenshot Cytoscape (desktop) Network File import menu.
Once the Network from File … option is selected, a file browser menu will open. Navigate to locate your file and select Open to begin the import process (Fig 9).
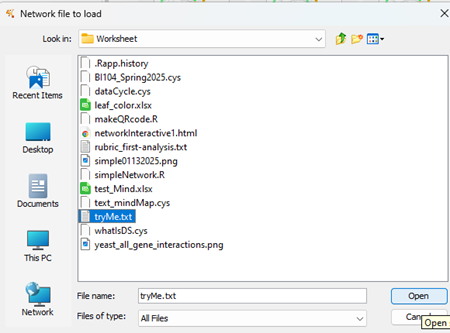
Figure 9. Screenshot Cytoscape (desktop) Network File import browse for file popup menu.
Figure 10 shows the next step. The text file is now in Cytoscape, but it’s not yet ready for import. The default delimiter in Cytoscape is TAB delimited columns, so we need to tell Cytoscape that our data is comma delimited (and yes, you could set up your data file as TAB-delimited to avoid this issue — comma delimited is the standard, most widely compatible delimiter format). Click on the Advanced Options… button to proceed (Fig 10).
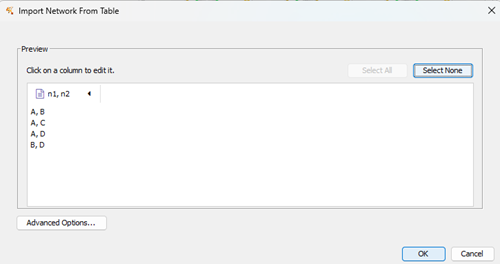
Figure 10. Screenshot Cytoscape (desktop) Import Network from Table preview.
Note that the imported text file was not recognized as comma delimited. Click on Advanced Options (Fig 10), which brings up a File Import Options context menu (Fig 11). Select check box next to “, (comma)” delimiter. Optionally, uncheck Tab delimiter.
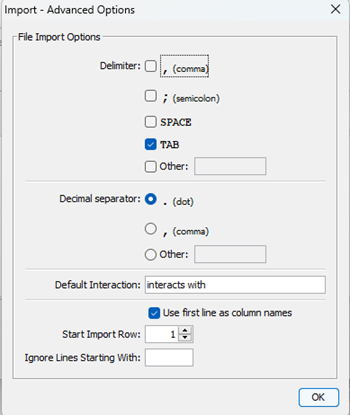
Figure 11. Screenshot Cytoscape (desktop) Import options menu.
Select OK once the delimiter settings are correct for your data file. Next, proceed to identify node sources for Cytoscape from your data file.
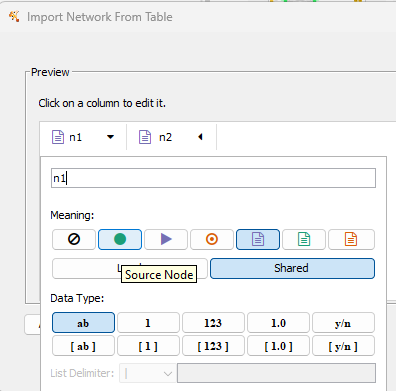
Figure 12. Screenshot Cytoscape (desktop) Import Network from Table; select source node column.
With n1 column selected, set source node (green circle, Fig 12 & Fig 13). Once set, click the next column, n2, to set target node (Fig 13).
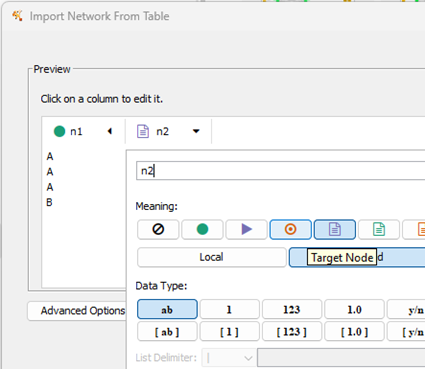
Figure 13. Screenshot Cytoscape (desktop) Import Network from Table. Select target node column.
With n2 column selected, set target node (red target circle, Fig 12 and Fig 13). Once both node source and target are set, click OK to draw the network graph (Fig 14).
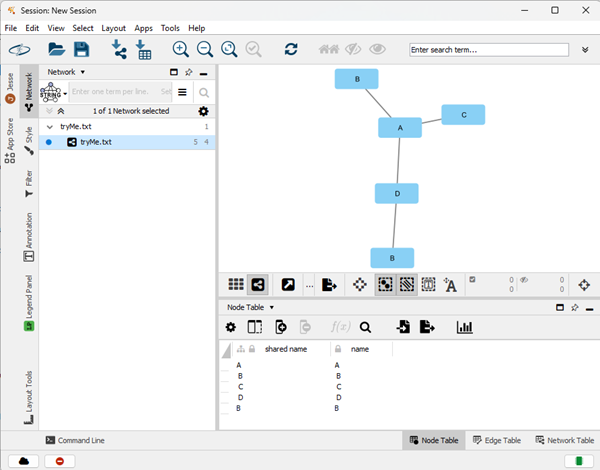
Figure 14. Screenshot Cytoscape workspace with network graphic and node table view windows.
Network is now ready for layout adjustments and analysis.
More about Cytoscape
Online user manual at https://manual.cytoscape.org/en/stable/index.html
Kohl, M., Wiese, S., & Warscheid, B. (2011). Cytoscape: software for visualization and analysis of biological networks. Data mining in proteomics: from standards to applications, 291-303.
Shannon, P., Markiel, A., Ozier, O., Baliga, N. S., Wang, J. T., Ramage, D., … & Ideker, T. (2003). Cytoscape: a software environment for integrated models of biomolecular interaction networks. Genome research, 13(11), 2498-2504.
Su, G., Morris, J. H., Demchak, B., & Bader, G. D. (2014). Biological network exploration with Cytoscape 3. Current protocols in bioinformatics, 47(1), 8-13.
Back to Systems Biology home
Return to Systems Biology home page