Create network from csv file
See Quick Tutorial: Building and Styling a Network in Cytoscape
This page has a worked example with screenshots. The example network involves actors in Spielberg movies
Synopsis
Cytoscape uses separate node and edge tables because they represent fundamentally different types of data in a network: entities (nodes) vs. relationships (edges). This structure allows for independent, granular analysis and visual styling of entities and their connections.
A worked example
Start Cytoscape — click here to review how to install and or start Cytoscape.
Example — create a network of Steven Spielberg crew for films Jaws, Close Encounters of the Third Kind, 1941, and Raiders of the Lost Ark.
Data source: Steven Spielberg movies, IMDB
I just Copy/paste then edited the data as needed. Three columns: Crew, Film, Department.
Note. This is a crude example of web scraping. It’s possible to automate much of the scraping from IMDB via the R package rvest. See Web scraping from a static webpage (rvest package) at Mike’s Workbook for Biostatistics for suggestions. Almost certainly, scraping from IMDB via rvest violates their Conditions of use policies. A package called imdbapi, which accesses tools in their public API would be better choice.
Build a simple spreadsheet file (Fig 1), then export to csv file. This is our node table. At minimum, this is enough to get Cytoscape to build a network graph.
The entire data set contained 1062 rows.
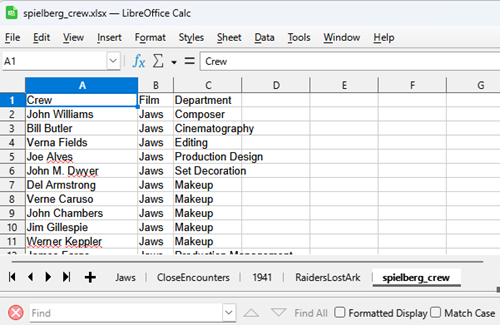
Figure 1. Screenshot portion of spreadsheet containing network list.
No doubt, you’d want to add more, for example:
- add more crew names
- add more films
- correct spelling so names match exactly
- standardize department names such as Editing instead of mixing Editor, Editing, Edit
- optionally add columns such as:
- year
- job_title
- gender
- oscar_winner
- repeat_collaborator
and these best would be placed into the second file, the edge table. For example, we would redo our simple node table as
Table 1. Updated node table
|
id |
node_type |
department_or_category |
first_year_in_dataset |
|
John Williams |
Crew |
Music |
1975 |
|
Michael Kahn |
Crew |
Editing |
1977 |
|
Jaws |
Film |
Film |
1975 |
|
Raiders of the Lost Ark |
Film |
Film |
1981 |
and provide the edge table
Table 2. New edge table.
| source | target | interaction | department | job_title | year |
| Steven Spielberg | Jaws | directed | Directing | Director | 1975 |
| John Williams | Jaws | worked_on | Music | Composer | 1975 |
| Michael Kahn | Raiders of the Lost Ark | worked_on | Editing | Editor | 1981 |
| Lawrence Kasdan | Raiders of the Lost Ark | worked_on | Writing | Screenwriter | 1981 |
Note: I use LibreOffice Calc as my spreadsheet app. To export to csv, select the worksheet — spielberg_crew in this example — then from the menu File > Save As… enter file name, select Text CSV (*.csv) from the Save as type drop down list. Options:
- Field delimiter: ,
- String delimiter: I delete the “
Google Sheets: File > Download > Comma Separated Values (.csv)
As always, save files to your project working folder.
This example is really a two-mode network:
- one node type = people
- one node type = films
Edges connect people to films, not usually people directly to people.
That means we can later ask questions like:
- Which crew members worked across multiple Spielberg films?
- Which departments show the most repeated collaboration?
- Which film has the densest crew network in the sample?
- Who appears as a bridge across several productions?
Import csv file into Cytoscape
For a clean workflow:
- Import the edge table first as the network.
- Tell Cytoscape:
- source column =
source - target column =
target
- source column =
- Then import the node table as node attributes.
- Match node table
idto Cytoscape node name/key.
For the example I used a different file, not the Spielberg film and crew project. The file simply contained a list of my co-authored publications along with the names of the authors.
Note: This is the very same task that SocialNetwork app was designed to do. Updated 2026 — The app hasn’t been updated in several years, but until relatively recently, it worked well. However, PubMed discontinued its legacy XML export format from the web interface, replacing it with the .nbib (Citation Manager) format. Work-arounds exist, and I’ll leave it at that.
Even though we are starting from a text file (.csv), Cytoscape calls these Network files. We begin by importing the file. We can drag the file to the start page, or File > Import > Network from File… (Fig 2).
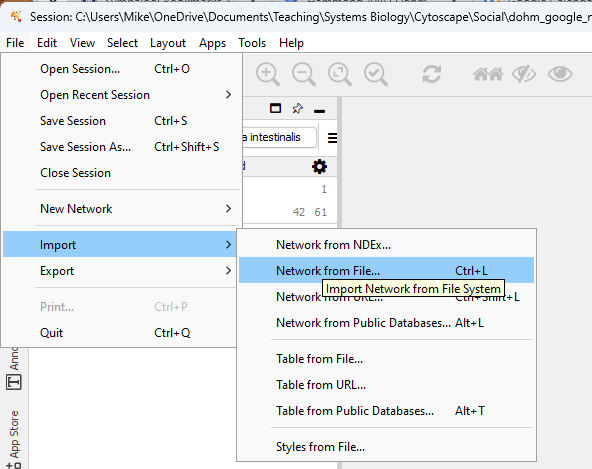
Figure 2. Screenshot of Cytoscape Import menu.
Navigate to your csv data file, select OK to load the file. You should see a popup like Figure 3.
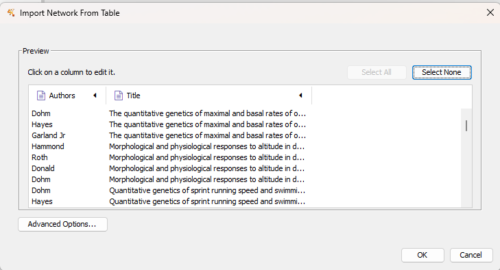
Figure 3. Screenshot of data table preview.
Need to tell Cytoscape which column is a source node, which is a target node.
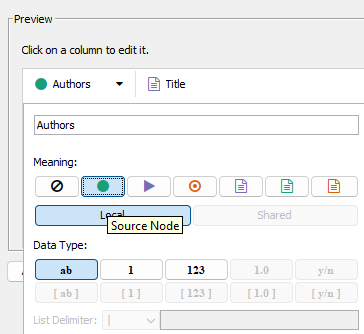
Figure 4. For Authors, source note (green circle icon).
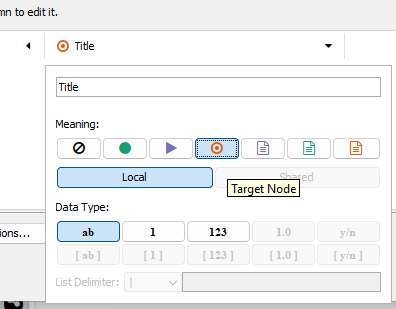
Figure 5. Publication title Target node (red target icon).
After setting the column information, click the OK button
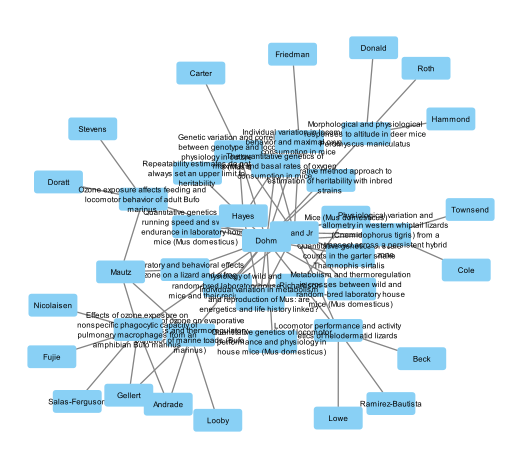
Figure 6. First network.